
This is a step-by-step guide for those who have purchased my WP Review Slider Pro WordPress plugin and want to use it to collect WooCommerce Product reviews.
Step 1: Import current product reviews.
Skip this step if you do not have any current WooCommerce product reviews.
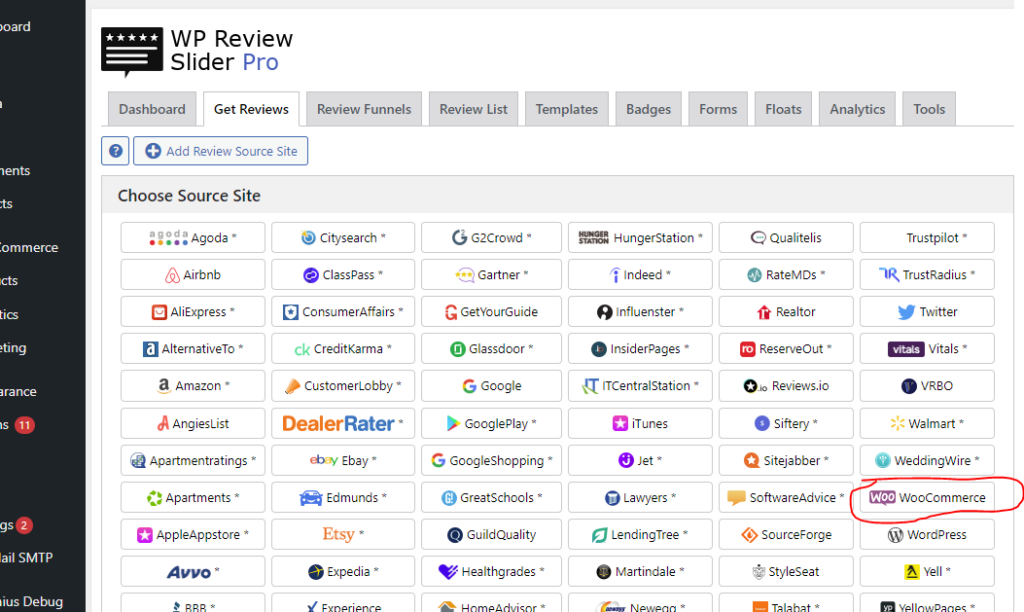
In your WordPress Admin, go to WP Review Slider Pro > Get Reviews > Add Review Source > Click WooCommerce.
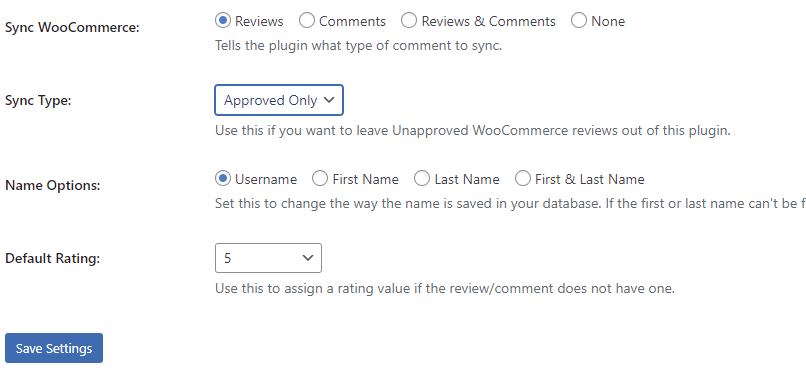
Select the Sync WooCommerce: Reviews option and then click Save Settings.
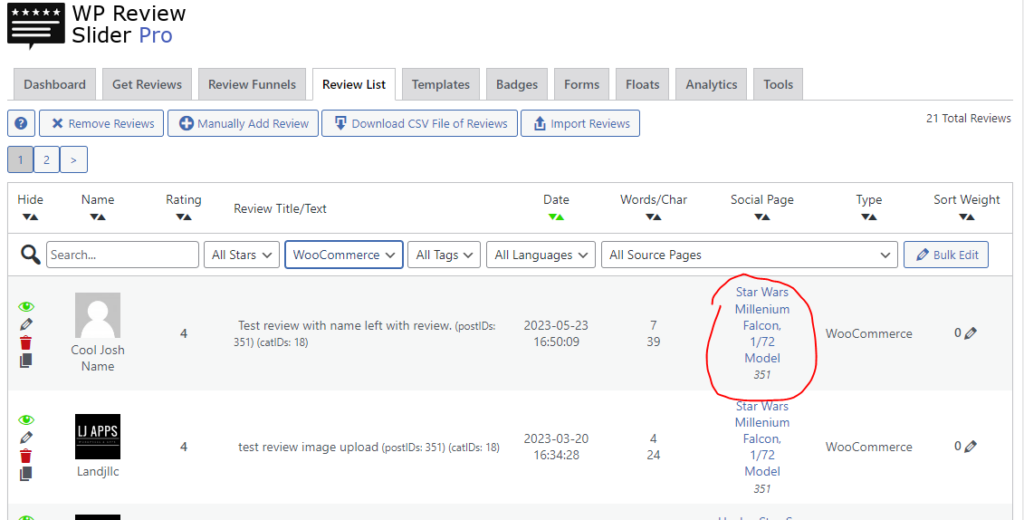
This will add all of your current WP customer reviews to the plugin, and they will show up on the Review List page.
Step 2: Turn off the WooCommerce built-in review system.
Now that we have the old reviews in the WP Review Slider Pro plugin you can turn off the WooCommerce review system.
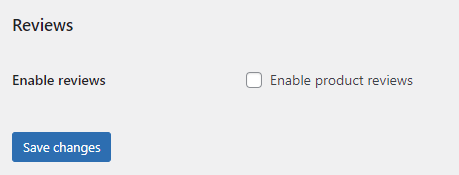
Go to WooCommerce > Settings > Products > General > uncheck “Enable product reviews” and Save Settings.
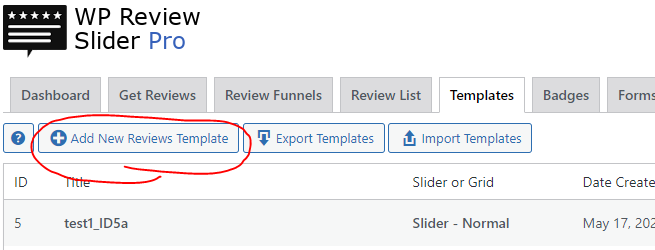
Step 3: Create a Review Template to Add to Product Pages.
Go to WP Reviews Pro > Templates > Add New Reviews Template button. This will be how we display the reviews on the Product page.
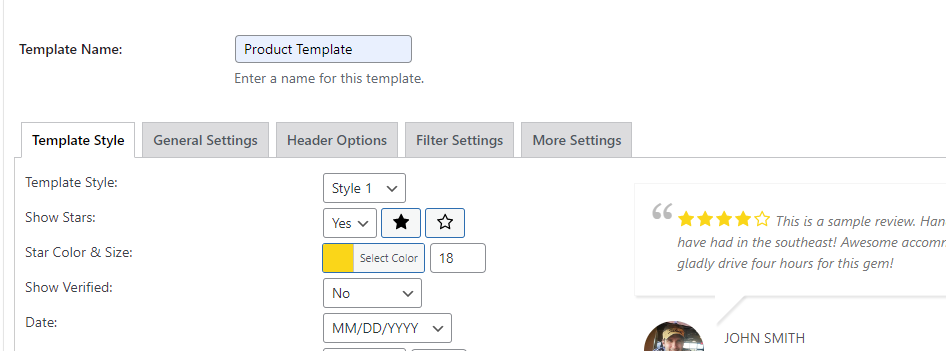
Give the review template a name and click Save & Close at the bottom. You can also change the look and feel here if you choose and even create a Grid or Slider.
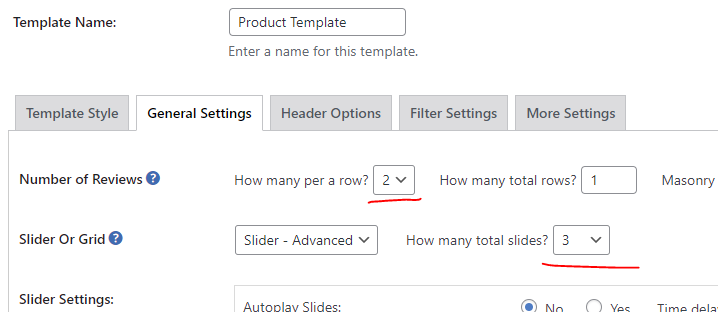
Now I’m going to change it to 2 reviews per slide and 3 slides.
You also have to turn on the Product Filter on the Filter Settings tab…
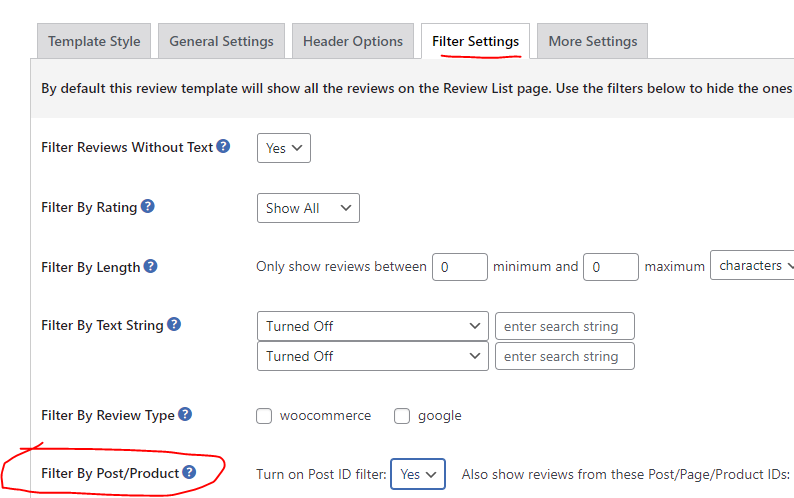
This tells the review template to only display reviews related to the current Product that is being displayed.
Step 3: Add the review template to your Product Pages.
After you save the template there will be a Shortcode button out to the right.
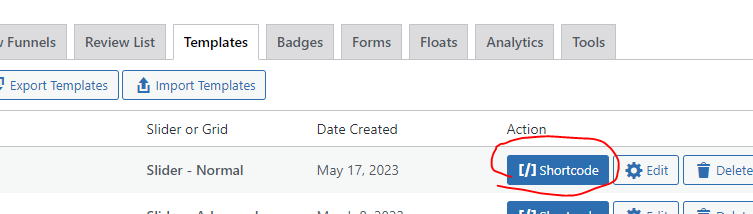
Click the Shortcode button and you should get a pop-up like this…
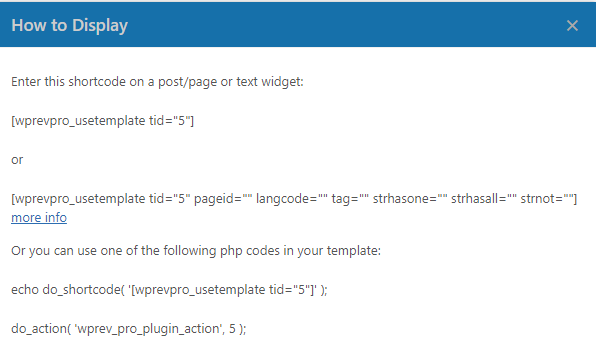
Basically, you have two options for adding the review template to the product page. You can copy and paste the Shortcode directly on the description for the product or you can add some code to your theme functions.php file. If you have a lot of products then you are going to want to add it to your theme code so you do not have to do it to every product.
Here is how I would add it to my functions.php file for my Divi theme.
Note: It is best to create a Child theme and add this code to it. Otherwise it will be deleted when you update your theme.
Go to Appearance > Theme File Editor > find the functions.php file and add this code…
// add review template on product page
function add_review_template($content) {
	if ( get_post_type( get_the_ID() ) == 'product' ) {
		$content .= do_shortcode( '[wprevpro_usetemplate tid="5"]' );
	}
	return $content;
}
add_filter('the_content', 'add_review_template');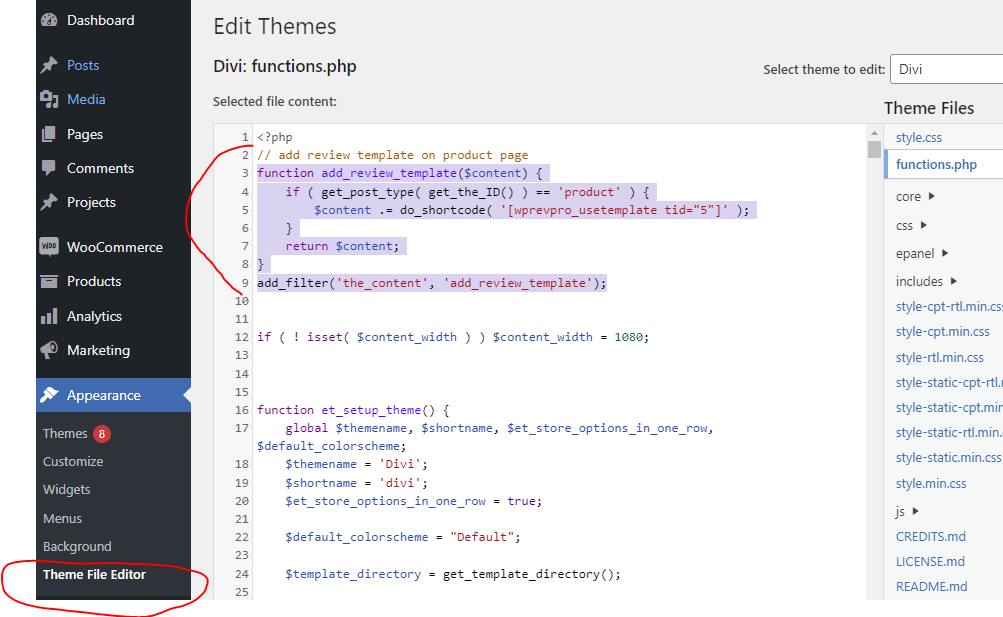
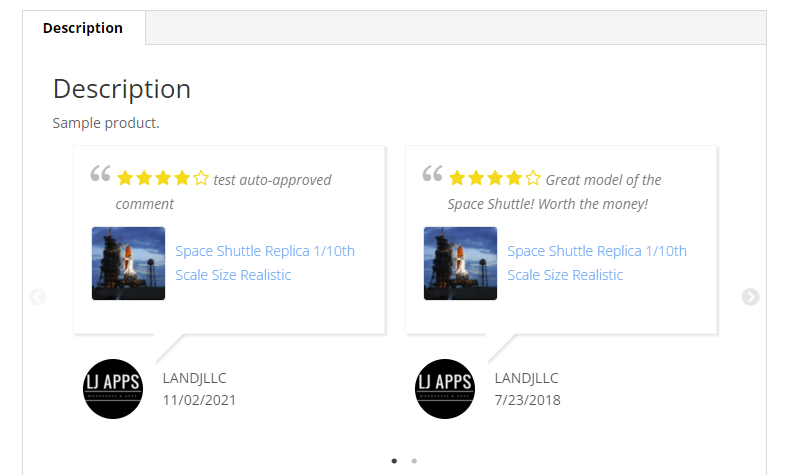
That should display the review template on every product under the description like so…
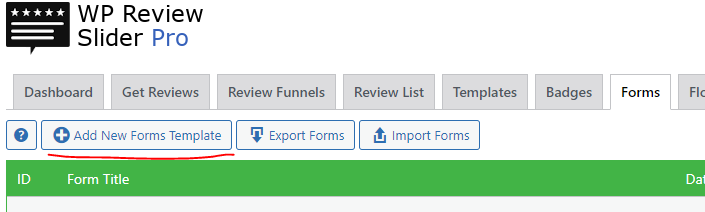
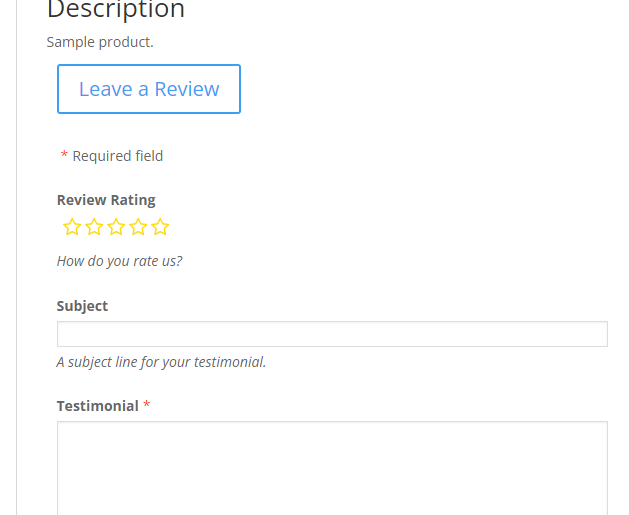
Step 4: Create a review submission form.
Go to WP Reviews Pro > Forms > Add New Forms Template.
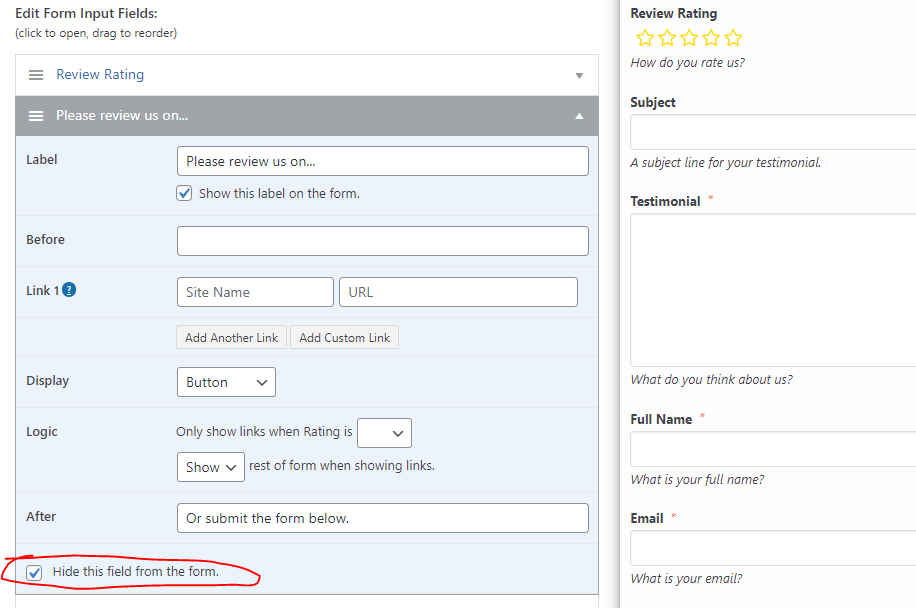
Give the Form a Title and you can hide some of the default Input fields and even add some custom ones. Use this to hide one…
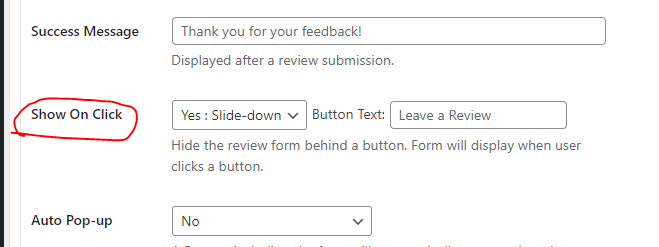
I also like to have the form slide down from behind a button. To do that look for this setting…
When you are ready click the “Done Editing Form” button at the bottom. Then click the Shortcode button at the top.
We are going to also add this to our functions.php file. So go back and change the code so it looks like so. Keep in mind that the Shortcode tid will be different for your Form.
function add_review_template($content) {
	if ( get_post_type( get_the_ID() ) == 'product' ) {
		$content .= do_shortcode( '[wprevpro_useform tid="3"]' );
		$content .= do_shortcode( '[wprevpro_usetemplate tid="5"]' );
	}
	return $content;
}
add_filter('the_content', 'add_review_template');

After you save the file you should now have the form on the Product page like so…
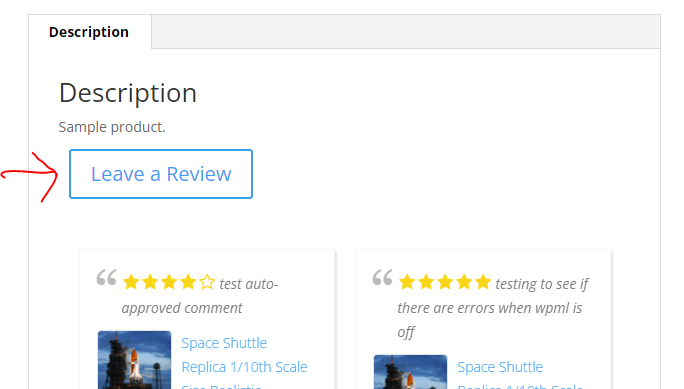
If you click the button it should expand to show the form like so…
Done!
Well, that’s about it. You can go back and edit the Review Template and Form to get the look you want. I hope this is helpful and let me know if you have any questions or issues by using the Contact methods built in to the plugin. Thanks! – Josh
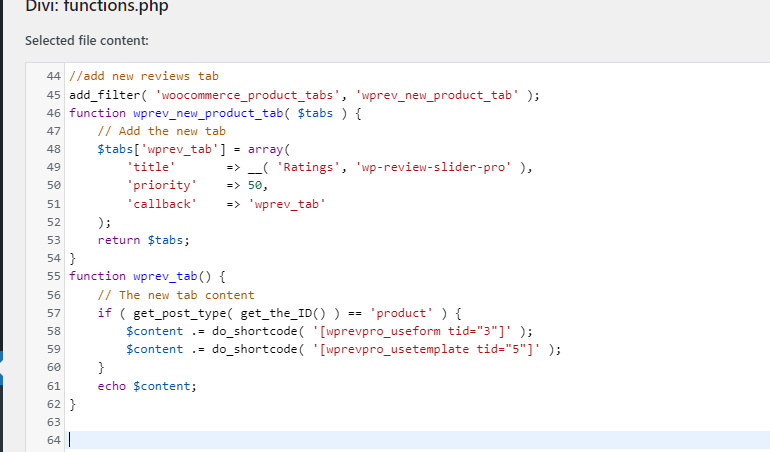
Bonus: What if you want to put the reviews and form under a Reviews Tab like Woocommerce?
Follow these instructions if you want to move the review template and form from the Description tab to a new tab.
Step 1: Change the code so it renders in a new tab.
Copy this code and replace the code you used above. Make sure you update the tid to match your template and form ids.
add_filter( 'woocommerce_product_tabs', 'wprev_new_product_tab' );
function wprev_new_product_tab( $tabs ) {
    // Add the new tab
    $tabs['wprev_tab'] = array(
        'title'       => __( 'Ratings', 'wp-review-slider-pro' ),
        'priority'    => 50,
        'callback'    => 'wprev_tab'
    );
    return $tabs;
}
function wprev_tab() {
    // The new tab content
    if ( get_post_type( get_the_ID() ) == 'product' ) {
 $content .= do_shortcode( '[wprevpro_useform tid="3"]' );
 $content .= do_shortcode( '[wprevpro_usetemplate tid="5"]' );
 }
 echo $content;
}
So now my functions.php file looks like so…
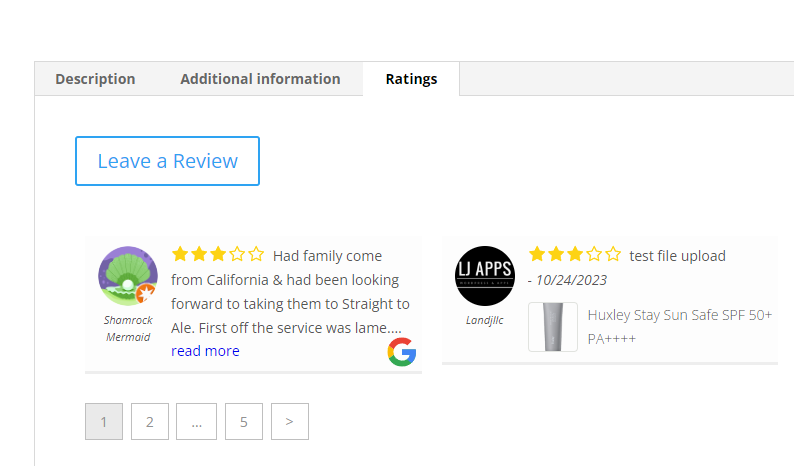
This will render my reviews under a new tab on the Product page…
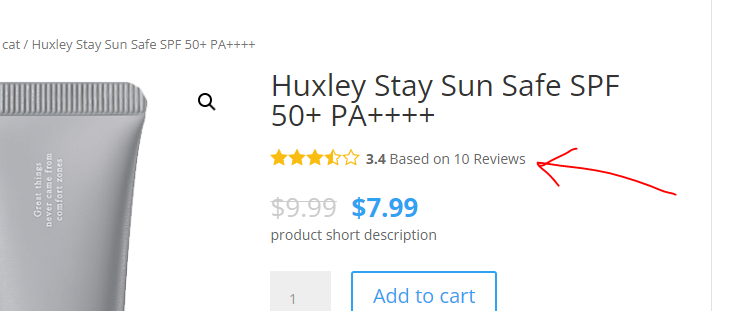
Step 2: Add a ratings badge at the top of the page.
Now, lets add a star rating badge at the top of the page under the product title. Like so…
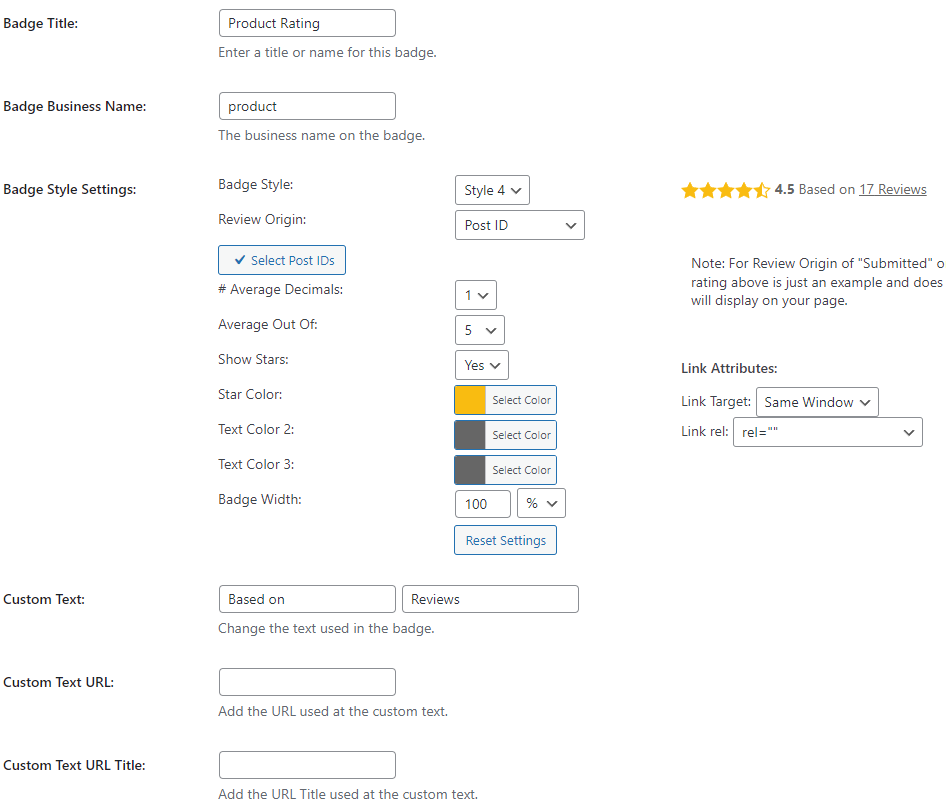
First, you’ll need to create a Badge on the Badge tab in the plugin.
I’m using Badge Style 4 with these settings. When you use the Review Origin set to Post ID it will pull the review data based on the current product id.
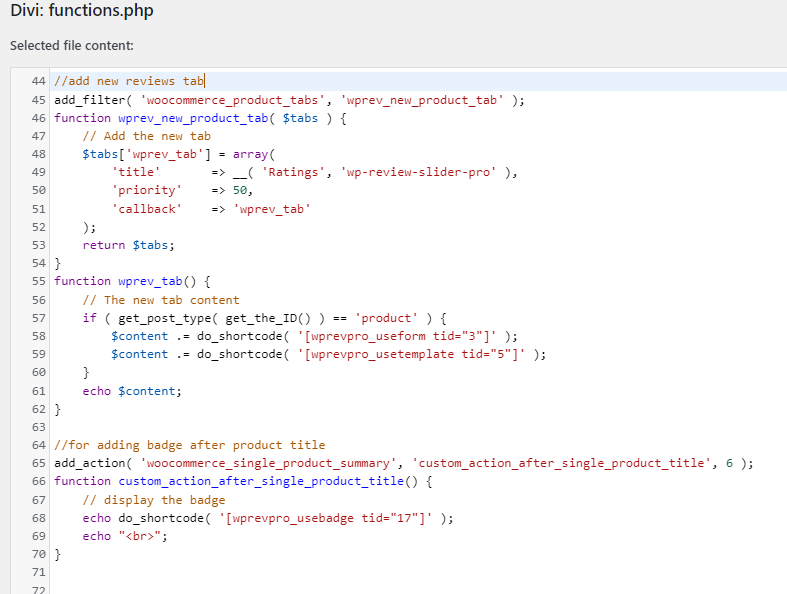
Second, add the following code to your functions.php
//for adding badge after product title
add_action( 'woocommerce_single_product_summary', 'custom_action_after_single_product_title',6);
function custom_action_after_single_product_title() {
// display the badge
echo do_shortcode( '[wprevpro_usebadge tid="17"]' );
echo "<br>";
}Note: You must also change your tid value to match that of the Badge you created. It will probably not be 17 like I have.
This is what my functions.php looks like now.
Step 3: Add a ratings badge under the Title on the Shop Page/Archive Page
Finally, we are going to add the ratings badge to the Shop page that lists all the products.
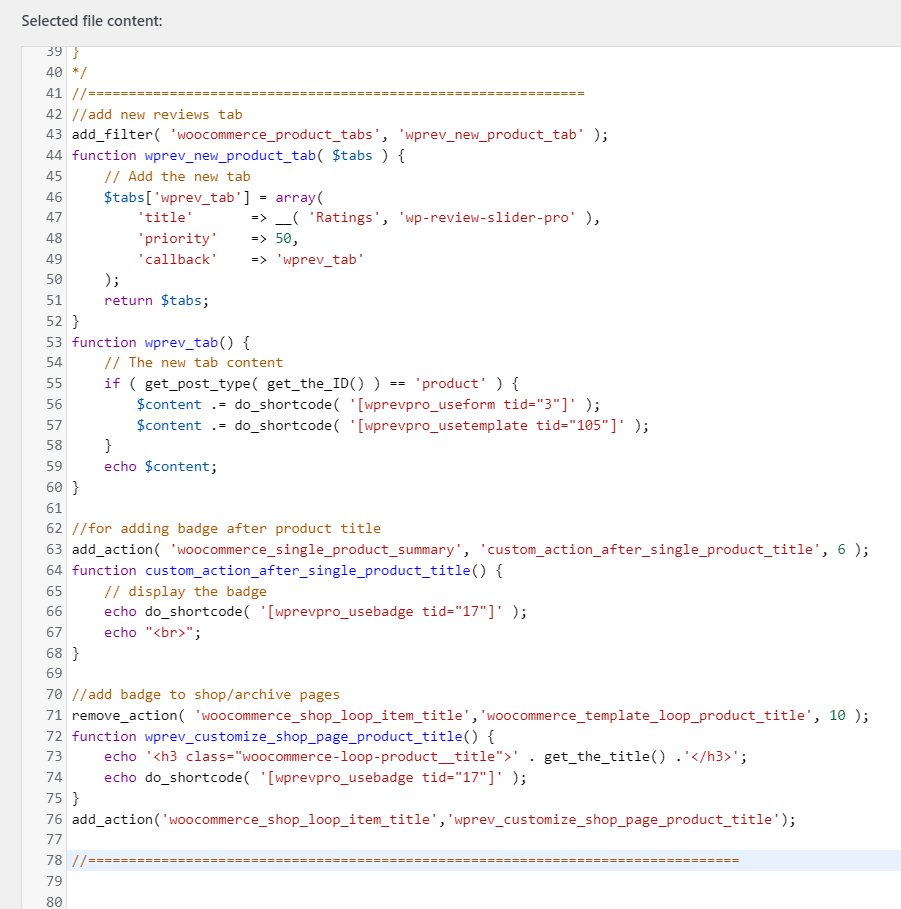
Add this code to the code that you have already added above. Be sure to edit the tid value in the shortcode so it matches your badge.
//add badge to shop/archive pages
remove_action( 'woocommerce_shop_loop_item_title','woocommerce_template_loop_product_title', 10 );
function wprev_customize_shop_page_product_title() {
    echo '<h3 class="woocommerce-loop-product__title">' . get_the_title() .'</h3>';
	echo do_shortcode( '[wprevpro_usebadge tid="17"]' );
}
add_action('woocommerce_shop_loop_item_title','wprev_customize_shop_page_product_title');
This bit of code will add that same badge to your shop page…
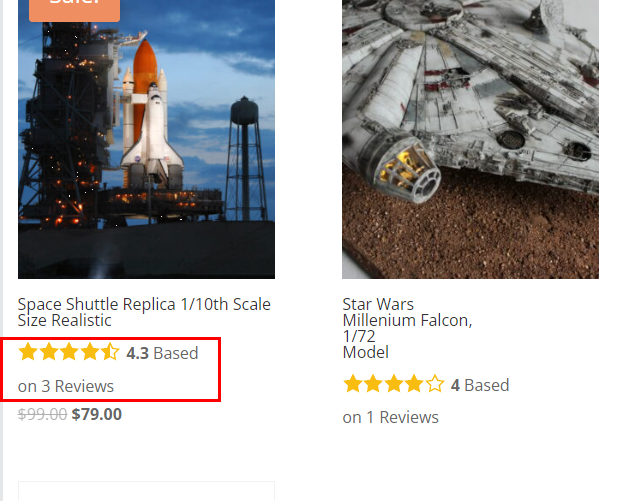
Note: You can also create a new badge here and remove the “Based on 3 Reviews” text if you like”. You would just update the tid value for the new badge.
Finally, this is all the code we entered. Keep in mind that you should be adding this to either a Child theme or a plugin that allows you to add code. There are a lot of them in the directory. If you add it to your main theme functions.php file, then it will get erased on the next theme update.
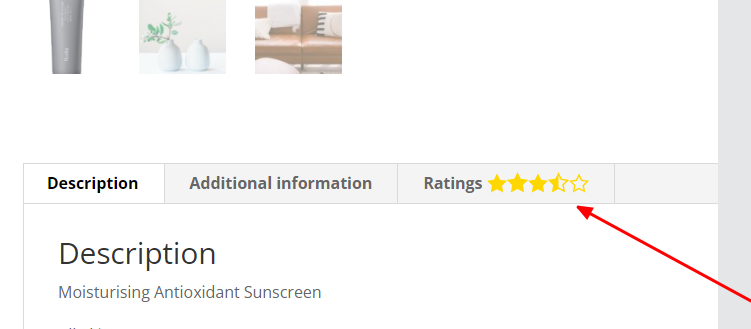
Bonus: How to add the star rating to the review tab title.
I recently got this question from a customer. To do this we will use a couple of built-in functions provided with the plugin. Make sure you are on the latest version. It will add the stars to the rating tab title like so…
To implement you will need to change the Add New Review Tab code we entered above. It will go from this…
function wprev_new_product_tab( $tabs ) {
    // Add the new tab
    $tabs['wprev_tab'] = array(
        'title'       => __( 'Ratings', 'wp-review-slider-pro' ),
        'priority'    => 50,
        'callback'    => 'wprev_tab'
    );
    return $tabs;
}
To this…
function wprev_new_product_tab( $tabs ) {
    // Add the new tab
    //Get average for this product and then get the starhtml
    $ratingvaluearray = wprevpro_gettotalavgs(get_the_ID());
    $starshtml = wprevpro_getstarhtml( $ratingvaluearray['avg_indb'] );
    $tabs['wprev_tab'] = array(
        'title'       => __( 'Ratings', 'wp-review-slider-pro' ). " ".$starshtml,
        'priority'    => 50,
        'callback'    => 'wprev_tab'
    );
    return $tabs;
}
Notice how it now uses the wprevpro_gettotalavgs and the wprevpro_getstarhtml functions to return the star html.