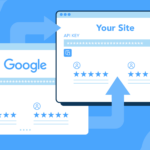
Are you looking to boost your website’s credibility and attract more customers? Leveraging the power of Google reviews to showcase positive feedback from satisfied clients can be a game-changer!
Google reviews serve as a testament to your business’s quality of service or products, influencing the decisions of potential customers. However, integrating these reviews into your website can be a perplexing task. Technical difficulties, changing Google policies, and the need for coding skills can pose significant challenges.
In this comprehensive guide, we’ll unravel the secrets of adding Google reviews to your site, enabling you to harness the influential force of user testimonials. Whether you run a small local business or a thriving online enterprise, integrating authentic reviews can instill trust in potential customers and ultimately drive conversions.
We’ll explore different methods, from manual embedding using the Google Business Profile API and JavaScript, to a more straightforward solution using a plugin like WP Review Slider Pro (WPRSP). This plugin simplifies the task of importing and displaying Google reviews, making it an accessible option for businesses of all sizes.
Get ready to earn the trust of your customers by embedding Google reviews!
Understanding the power of Google reviews
Google reviews hold significant sway in shaping a business’s online reputation. They are user-generated evaluations of your business left by customers on your Google Business Profile profile (formerly known as Google My Business (GMB)). These reviews showcase genuine opinions, experiences, and ratings, allowing potential clients to gain valuable insights before making a purchase or engaging your services.
Positive reviews can enhance a business’s image, acting as a testament to the quality of its products or services. On the other hand, negative reviews can offer valuable insights into areas for improvement, allowing businesses to address customer concerns and improve their offerings.
Google reviews also play a crucial role in:
- Building trust: Google is widely trusted by users worldwide. When potential customers come across Google reviews on your website, they perceive it as authentic and unbiased feedback. This credibility establishes trust and confidence in your brand, significantly influencing purchase decisions.
- Improving SEO and visibility: Google values fresh and relevant content. By learning how to embed Google reviews in WordPress, you constantly update your website with new user-generated content, which enhances your website’s search engine optimization (SEO) and makes your business more discoverable.
- Enhancing user engagement and interaction: Visitors can read, rate, and leave their reviews directly on your platform, fostering a sense of community and facilitating meaningful conversations about your products or services.
The fruitful impacts of Google reviews don’t end there. Making your Google reviews accessible and visible on your site can take your credibility to new heights and yield tangible profits for your business!
Boosting credibility and conversions with Google reviews
Credibility lies at the heart of any successful business. That’s why engaging with customers through review responses is essential. Managing and responding to Google reviews effectively boosts a business’s credibility and social proof.
Both positive and negative online reviews offer opportunities to showcase your commitment to customer satisfaction. Acknowledging positive feedback with a simple “thank you” illustrates appreciation for your customers’ support. Meanwhile, addressing negative reviews empathetically and offering solutions publicly displays your dedication to resolving issues and providing excellent service.
WP Review Slider Pro can be invaluable in this regard. It allows businesses to easily display their positive reviews, providing a visual testament to their quality. The automatic update feature of WP Review Slider Pro ensures that the most recent and relevant reviews are always displayed. This keeps the business’ review profile up-to-date and relevant, further boosting its credibility and conversion rates.
How to add Google reviews to your website
Embedding Google reviews on your site can broadly be divided into two categories: manual integration and using a plugin or a Google reviews widget.
For the sake of this tutorial, we’ll be focusing on how to add Google reviews to WordPress websites specifically.
Before you can display Google Reviews on your website, you need to have a Google Business Profile account. If you haven’t created one yet, head over to the Google Business Profile website and follow the straightforward registration process.
Ensure that your Google business profile accurately represents your business by filling in essential details like location, contact information, and business hours. Having a complete and updated profile will enable Google to associate your reviews correctly.
Manual implementation
We will be walking you through two manual approaches – both require a comprehensive understanding of how Google APIs work, and experience with coding and debugging.
If you find yourself having a hard time dealing with the complexities of these two manual methods, you can always opt for using the WP Review Slider Pro plugin instead – no coding or debugging required at all. Skip to the “Using a plugin” section for an easy-to-follow tutorial on quickly displaying your Google reviews on your site using WP Review Slider Pro.
Otherwise, here is a simplified overview of the two manual processes for adding Google reviews to your website manually.
Manual method 1 (using the JSON key file)
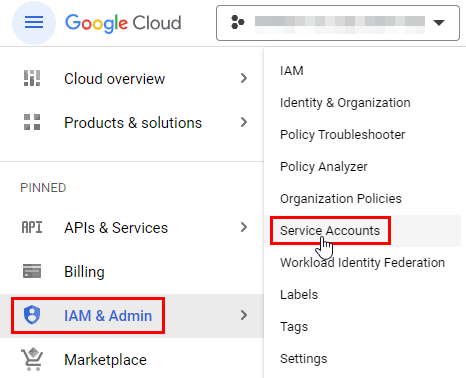
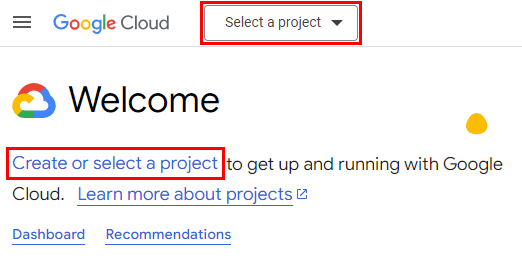
- Visit the Google Cloud Console and create a new project by clicking on the drop-down at the top of the Create or select a project link view.

- From the sidebar on the left, hover over IAM & Admin, then click on Service Accounts.
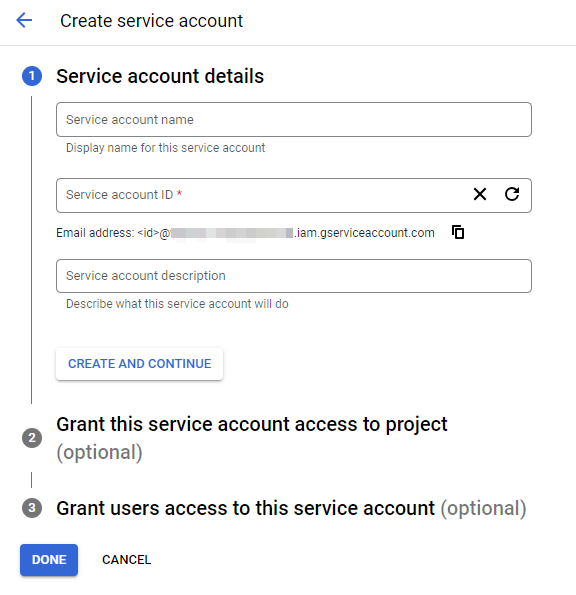
- Click on + CREATE SERVICE ACCOUNT on the top.

- Fill in the details according to your project, then click DONE.
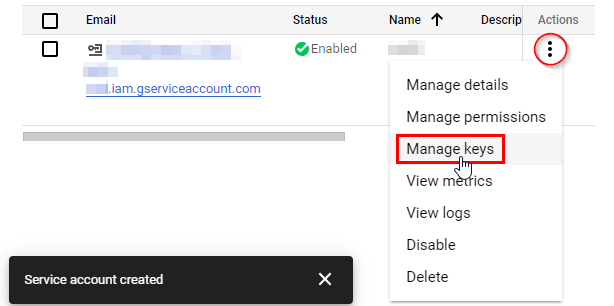
- Once your service account is created, you’ll need to generate an API key to be able to fetch your Google reviews. Click on the three dots in the Actions column, then click on Manage Keys.
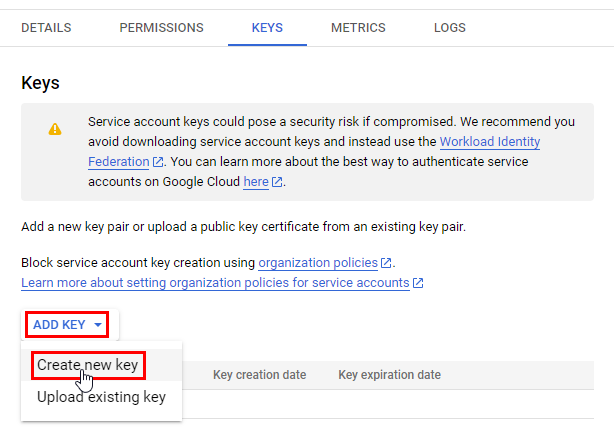
- Click on ADD KEY, then click Create new key.
- Select the JSON option and click CREATE.
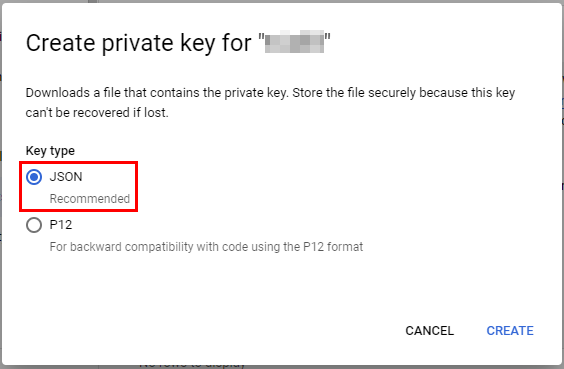
- You’ll be immediately prompted to save the JSON file that contains your service account’s private key. Save it somewhere safe and secure on your device.
- In the functions.php file of your WordPress child theme, install the Google API client library for your programming language of choice (which could be PHP or JavaScript). For this tutorial, we will continue with JavaScript. Add the following script:
<script src="https://apis.google.com/js/api.js"></script>
- Before making any API requests, you need to initialize the Google API client library with your JSON API key from step 7, or OAuth credentials to create a client object.
<script>
functioninitGoogleApiClient() {
    gapi.load('client', function () {
// Initialize the API client with your API key or OAuth credentials
      gapi.client.init({
        apiKey: 'YOUR_API_KEY', // Replace with your JSON API key
        clientId: 'YOUR_CLIENT_ID', // Replace with your OAuth Client ID
        discoveryDocs: ['https://www.googleapis.com/discovery/v1/apis/mybusiness/v4/rest'],
        scope: 'https://www.googleapis.com/auth/business.manage', // Scope for managing business data
      }).then(function () {
// API client is ready for use
// You can proceed with making API requests here
      }, function (error) {
        console.error('Error initializing Google API client:', error);
      });
    });
  }
</script>
- Call the initGoogleApiClient() function to initialize the Google API client library by adding the following script:
<script src="https://apis.google.com/js/client.js?onload=initGoogleApiClient"></script>
- Call the gapi.client.request method to perform HTTP requests to the API endpoints. For example, to get reviews for your business, you can use the following code:
<script>
  function getBusinessReviews() {
    gapi.client.request({
      path: 'https://mybusiness.googleapis.com/v4/accounts/ACCOUNT_ID/locations/LOCATION_ID/reviews',
      method: 'GET',
    }).then(function (response) {
      // Handle the API response here
      console.log('Business Reviews:', response.result);
    }, function (error) {
      console.error('Error getting business reviews:', error);
    });
  }
</script>
Replace ACCOUNT_ID and LOCATION_ID with your actual Google Business Profile account ID and location ID, respectively. Also, check the official Google documentation on the API to stay up-to-date.
After that, the handling and displaying of the Google reviews on your WordPress site will likely involve further processing of the API response (using HTML, CSS, and JS) to show the data in a user-friendly way to your customers.
Manual method 2 (using Google Place ID)
- Visit the Google Cloud Console and create a new project by clicking on the drop-down at the top of the Create or select a project link.
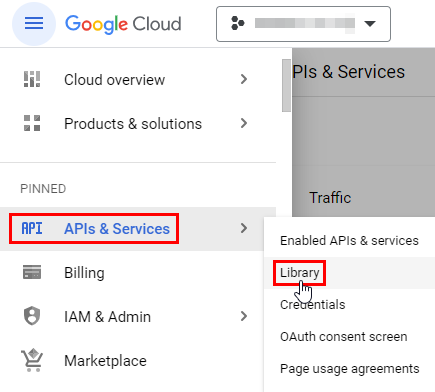
- From the nav bar on the left, hover over API & Services, then click on Library.
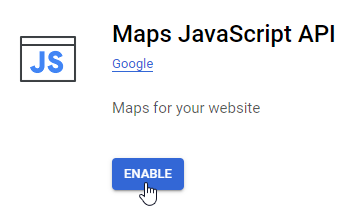
- Search for the Maps JavaScript API and enable it.
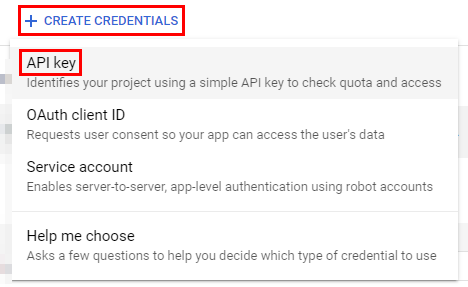
- Generate an API key, which is necessary to access your Google data and display the reviews on your website. Go back to the navigation menu and select APIs & Services > Credentials.
- Click on the Create Credentials button, and then select API key from the drop-down menu.
- Optionally, you can restrict the usage of your API key to specific websites or IP addresses for security purposes.
- After creating the API key, a dialog box will appear displaying your newly generated API key. Copy the API key and keep it safe. You will need to include this API key in your website’s code to access the Google Maps Platform API and fetch the reviews.
- Go to Google Place ID Finder to get your Google Place ID, which is a unique identifier for your business location.
- Type the name of your business in the search bar on the map.
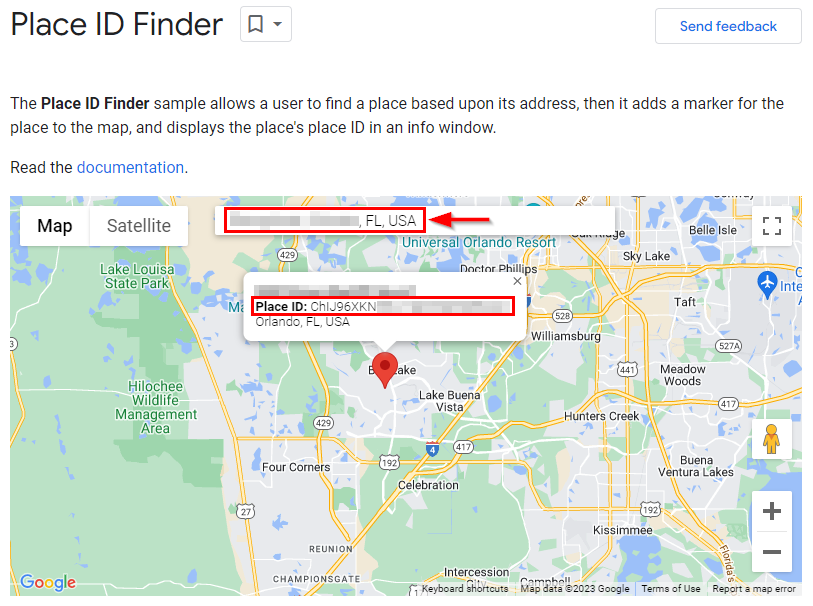
- Copy the Place ID from the card on the map and keep it handy for later steps.
- Include the following script in the functions.php file of your child theme (which is recommended when adding custom code or modifying a theme):
<script src="https://maps.googleapis.com/maps/api/js?key=YOUR_API_KEY&libraries=places"></script>
Replace YOUR_API_KEY with the API key you generated in step 7.
- Create a function to fetch the place details, which we’ll then extract the reviews from using another function. Here is a sample JavaScript code:
<script>
functiongetPlaceDetails() {
const placeId = 'YOUR_PLACE_ID'; // Replace with your Place ID
const request = {
    placeId: placeId,
    fields: ['reviews'],
  };
const service = new google.maps.places.PlacesService(document.createElement('div'));
service.getDetails(request, (place, status) => {
if (status === google.maps.places.PlacesServiceStatus.OK) {
const reviews = place.reviews;
      displayReviews(reviews);
    } else {
      console.error('Error fetching place details:', status);
    }
  });
}
</script>
Make sure to include a trigger for this code, such as onclick or onload.
- Extract the review data obtained from the response from the getPlaceDetails() function. Once you have the reviews data, you can display them on your website. Here’s a sample JavaScript function to extract and log the reviews data:
<script>
function displayReviews(reviews) {
  if (!reviews || reviews.length === 0) {
    console.log('No reviews found.');
    return;
  }

  reviews.forEach((review) => {
    const authorName = review.author_name;
    const rating = review.rating;
    const reviewText = review.text;
    const reviewTime = new Date(review.time * 1000).toLocaleDateString(); // Convert Unix timestamp to a readable date

    console.log('Author:', authorName);
    console.log('Rating:', rating);
    console.log('Review:', reviewText);
    console.log('Review Date:', reviewTime);
    console.log('---');
  });
}
</script>
The displayReviews() function takes the reviews array as an argument and iterates through each review, extracting relevant information such as the author’s name, rating, review text, and review date.
For demonstration purposes, this code logs the extracted data to the console, but you can modify it to display the reviews on your website using HTML and CSS.
That’s it! Remember, these two manual approaches require advanced coding skills and technical experience, as you’ll need to be able to handle errors and bugs efficiently when using Google’s API and content.
If you’re not comfortable with coding, or if you’re looking for a simpler and quicker solution, you can use a plugin to embed your Google reviews.
Using a plugin
There is a much easier way to incorporate your Google reviews into your WordPress website or WooCommerce store – using the WP Review Slider Pro (WPRSP) WordPress plugin!
WPRSP stands out among other plugins available on the market that can fetch and display Google reviews on your website. It automatically pulls customer reviews from Google and other popular review sites and displays them on your website. It also allows you to customize the appearance of the reviews and automatically updates the reviews to ensure they’re always up-to-date.
Here’s how you can use WP Review Slider Pro to add Google reviews to your website:
- Purchase the WP Review Slider Pro plugin, upload it to your WordPress, then install and activate it.
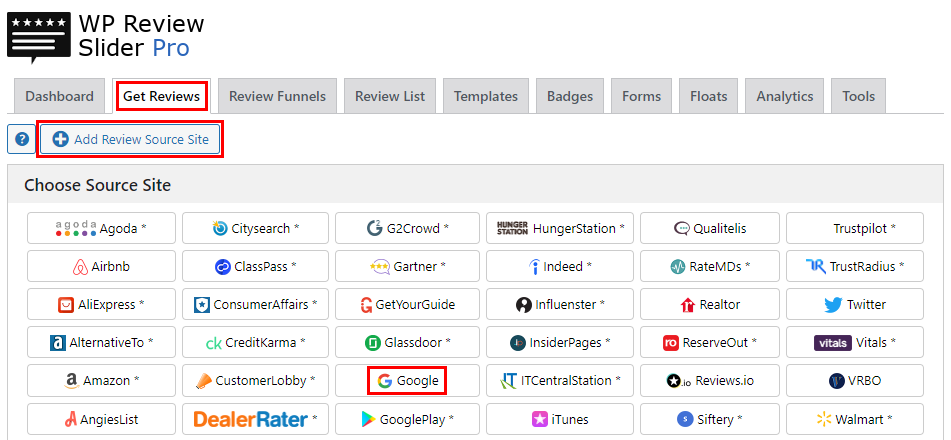
- From your WordPress dashboard, click on the plugin from the left menu, click on the Get Reviews tab, click on Add Review Source Site, and then click on the Google icon.
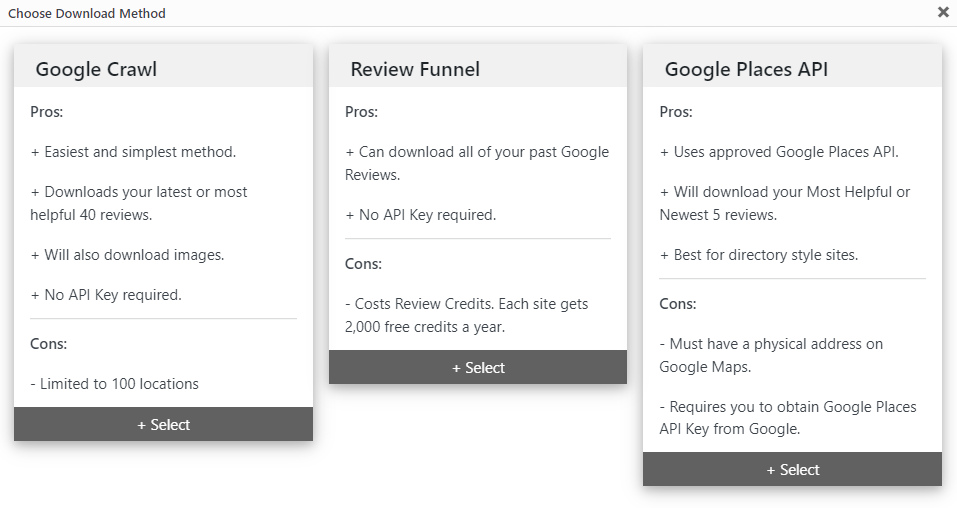
- Select the option that suits you best and keep your Google info on hand. For this tutorial, we are going to choose the Google Crawl options.
- Click on Add New Source Page.

- Enter your Google Place ID or search terms, fill in the rest of the fields according to your requirements, then click save.

- You’ll be directed to the list of Google source pages you have set up. At the top of the list, you’ll see the source page you just added. Click on its corresponding Get Reviews button. Your Google reviews will then be fetched and downloaded to the plugin.

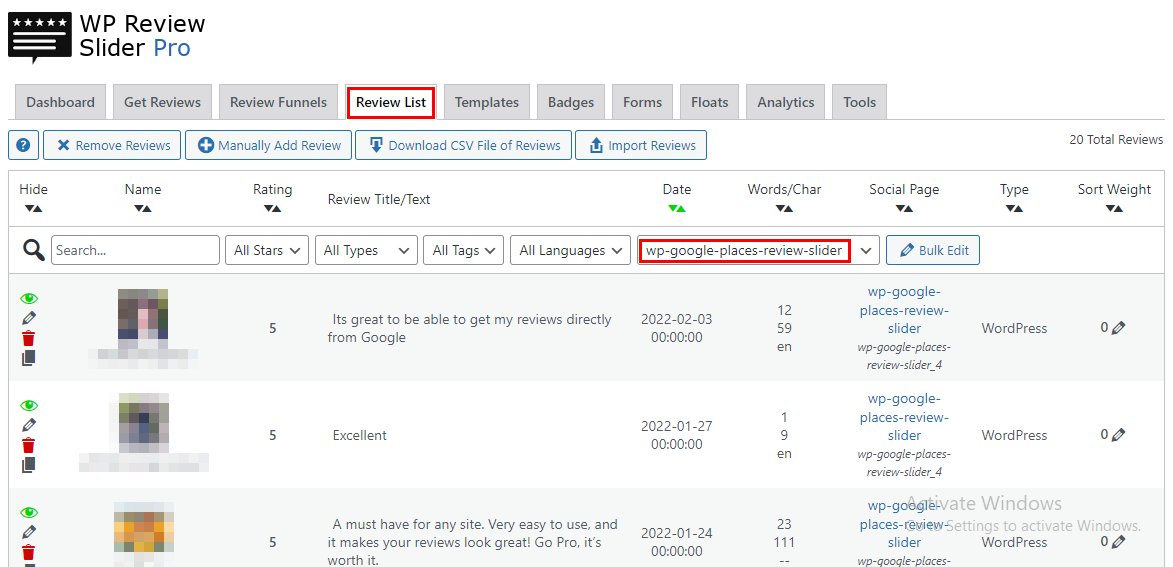
- Go to the Review List tab. Here, you’ll find all your reviews from the different source sites you set up. Filter the list to show your Google review. You can use the up and down arrows at the top to filter your reviews according to the ratings or even the number of words or characters in the reviews.
- You can also customize how your Google reviews appear on your website by creating a review template where you can add review filters and customize how your Google reviews will look on your WP site for total brand coherence.


- Once you’ve customized your reviews template to your liking and saved it, you’ll find it in the list in the Templates tab. To display your Google reviews, click on the Shortcode button corresponding to your template.

- WP Review Slider Pro will give you three options to embed your reviews on your site. Choose whichever one is easier for you.
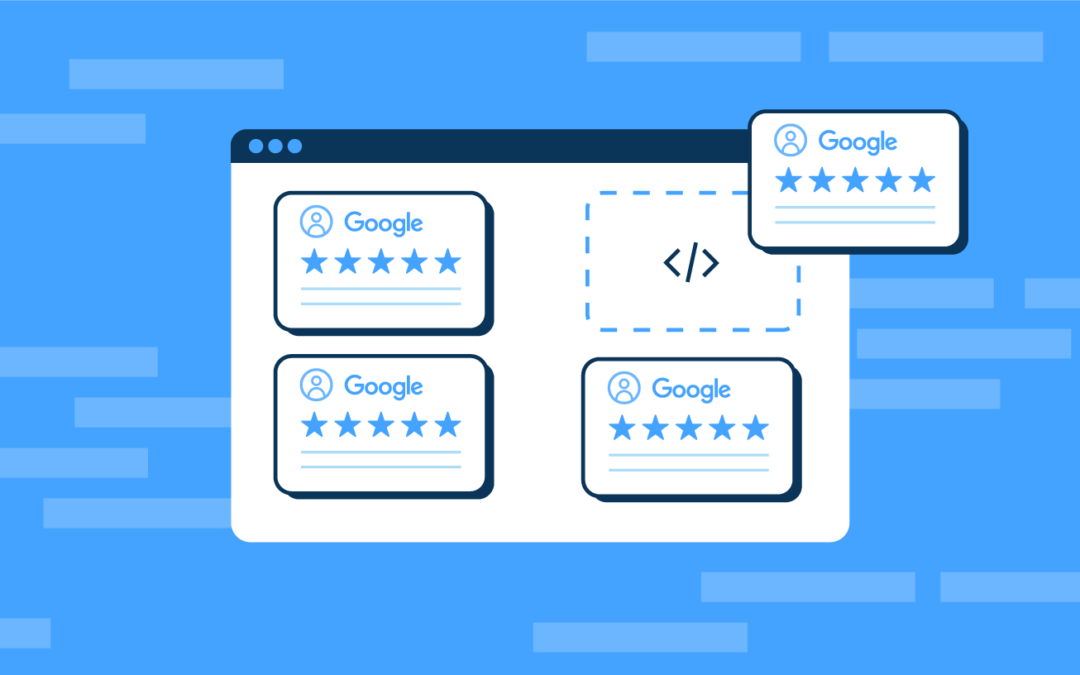
And that’s how easy it is to embed your Google reviews into your site! Your results should be similar to this:

Whether you choose to manually implement Google reviews, or use a plugin to help you, the important thing is to make the reviews visible and accessible to your website visitors. By doing so, you can leverage the power of Google reviews to boost your online reputation, attract more customers, and drive conversions.
Challenges in embedding Google reviews
Incorporating Google reviews on a website can present a number of challenges, both technical and non-technical. Understanding these challenges can help you navigate the process more effectively and ensure a smooth integration.
Technical difficulties
- Managing API keys and tokens: Dealing with Google’s APIs, OAuth tokens, or service accounts can be complex. If not handled correctly, it can create security risks.
- Rate limits and quotas: The Google Business Profile API has rate limits and quotas that restrict the number of requests that can be made. If your website makes frequent API calls, you could hit these limits, resulting in temporarily blocked access.
- Overcharging: The Google Maps JavaScript API is free up to a certain usage limit. If you anticipate high traffic and usage on your website, make sure to review the pricing details on the Google Cloud Console to avoid unexpected charges.
- Displaying reviews: Google reviews come in a structured format from the API, which may require parsing and formatting to display correctly on your website. Controlling how the reviews show can therefore be a challenge.
- Review moderation: Filtering or moderating reviews manually requires additional custom code, adding another layer of complexity to the process.
Non-technical problems
- Navigating Google’s policies related to displaying reviews.
- Moderating and customizing reviews.
- Managing the time and resources required for these tasks.
These issues can negatively impact your business’s online reputation and customer trust if not handled properly.
Overcoming technical hurdles in Google review integration
Despite these challenges, there are practical ways to overcome common technical difficulties, including:
- Understand Google’s APIs: Make sure you have a clear understanding of the available endpoints, parameters, and response formats, which can be found in the API documentation.
- Secure API credentials: Avoid hard-coding the API credentials into the custom code, as this poses significant security risks.
- Test the API: Thoroughly test the API on different devices to ensure compatibility and functionality.
- Backup your website: Always back up your website before starting any edits or using a child theme. This ensures you can restore your website if something goes wrong.
Tools and plugins can greatly simplify the process of embedding Google Reviews, reducing the need for technical expertise. For instance, WP Review Slider Pro offers a user-friendly interface, customizable templates, and automatic review updates, making the integration of Google reviews a breeze.
Optimizing Google reviews for local SEO
Local SEO is a subset of search engine optimization that is particularly important for businesses with a physical location or those serving a specific geographic area. It allows these businesses to connect with potential customers in their vicinity, driving foot traffic to their stores and increasing online engagement.
Here are some practical tips on how to optimize your Google Reviews for local SEO:
- Encourage reviews: Actively encourage your customers to leave reviews. This can be done through various means, such as sending follow-up emails after a purchase or providing incentives for leaving a review.
- Respond to reviews: Make it a habit to respond to all reviews, both positive and negative. This shows that you value customer feedback and are committed to improving your services.
- Use local keywords: When responding to reviews, try to incorporate local keywords. This can help improve your visibility for local search queries.
The WP Review Slider Pro plugin can be a valuable tool in your local SEO strategy. Its automatic review update feature ensures that the most recent and relevant reviews are always displayed on your website, further improving your local SEO performance.
Attracting more customers with local SEO strategies
Displaying glowing testimonials and high ratings from satisfied customers can build trust and credibility, encouraging potential clients to choose your business over competitors. Here is how you can do that:
- Employ email campaigns, social media posts, or in-store signage to serve as gentle reminders for customers to share their experiences.
- Offer incentives, like discounts or small giveaways, to motivate customers to leave reviews.
- Craft thoughtful responses to reviews to not only help in managing your business’s online reputation but also boosts local SEO.
- Engage with customers in a friendly and professional manner to demonstrate excellent customer service. This will reflect positively on your website’s search rankings.
WP Review Slider Pro provides features that can significantly assist you in attracting more customers through local SEO, making this step a breeze. The plugin’s customizable templates enable you to display reviews in an eye-catching and appealing manner on your website, leaving a lasting impression on potential customers.
Managing your online reputation
Online reputation management (ORM) is crucial for businesses in today’s digital age. One negative review can significantly impact a business’s reputation and customer trust.
WP Review Slider Pro can be a game-changer in managing your online reputation. The plugin allows businesses to catch and address negative feedback before it reaches social media, turning potential negatives into positive customer service moments. WPRSP facilitates:
- Centralized control: Instead of manually checking each platform for reviews, the plugin gathers all these reviews in one place within your WordPress dashboard. This centralized control simplifies the process of monitoring your online reputation.
- Review notifications: The plugin includes a notification system that alerts you when a new review has been fetched. This can be in the form of an email notification or an alert within your WordPress admin area, ensuring you’re promptly informed about new feedback.
- Response management: Reputation monitoring goes beyond just knowing that a review has been posted. WPRSP also enables you to manage your responses to reviews directly. You can respond to positive reviews to express gratitude and reinforce a positive image, and you can address concerns from negative reviews to show your commitment to customer satisfaction.
- Timely engagement: By being notified of new reviews quickly, you can engage with customers in a timely manner. Responding promptly to reviews demonstrates that you value customer input and are actively involved in maintaining a positive customer experience.
- Conflict resolution: In cases of negative reviews or customer complaints, the reputation monitoring feature allows you to address the issue before it escalates. Responding professionally and trying to resolve the problem can turn a negative experience into a positive one and showcase your dedication to customer service.
- Public perception: How you respond to reviews, particularly negative ones, is visible to potential customers. Demonstrating your willingness to address concerns can mitigate the impact of negative feedback and enhance your reputation.
To make the most of WPRSP’s reputation management features, implement the following:
- Set up notifications: Set up automated notifications for negative reviews. This allows you to respond promptly and address the issue before it escalates.
- Respond professionally: Always respond to negative feedback in a professional and respectful manner. Apologize for the customer’s bad experience and offer a solution.
- Follow up: Once you’ve addressed the issue, follow up with the customer to ensure they’re satisfied with the resolution.
By effectively managing your online reputation, you can build stronger relationships with your customers, improve customer loyalty, and ultimately drive more business.
Start leveraging Google reviews with WP Review Slider Pro today
Google reviews play a pivotal role in enhancing a business’s online reputation, boosting credibility, improving local SEO, and driving conversions. They provide a platform for customers to share their experiences, and for businesses to showcase their commitment to customer satisfaction.
WP Review Slider Pro makes the process of displaying Google reviews on your website a breeze. With its user-friendly interface, you can easily fetch and embed reviews from your Google Business Profile account. Its customizable templates allow you to seamlessly integrate reviews into your website’s design.
With automatic review updates, you’ll be able to display the most recent and relevant reviews. Even better, it will help you effectively manage your online reputation by catching and addressing negative feedback before it reaches social media.
Don’t miss out on harnessing the benefits that come with embedding your Google reviews on your website. Start leveraging Google reviews with WP Review Slider Pro today, and take your online reputation, credibility, and conversions to new heights!